
You can also open the SharePoint site or page for editing from within SharePoint Designer using the "Open Site" or "Open.." dialogs within the application:

When you open such a page from such a site directly from Internet Explorer, or from SharePoint Designer, you will see the page in SharePoint Designer, and be able to modify it using the designer mode or the code mode:

So lets figure out why some of the pages give us the following message when we try to edit them in SharePoint Designer:
"This page cannot be edited in SharePoint Designer. You can edit the content in the browser, or edit the corresponding page layout in SharePoint Designer"

Why is that? well, simply because the page you are trying to edit is under the publishing feature. It is a publishing page, and as such, by default, gets it's layout from the layout page and the master page.
The only change you should be doing on such a page is edit it in the browser and add\remove\change web parts in it.
However, there is a way to work around this - detach it from it's layout page. This is similar to the ghosting\unghosting process that we had back in SharePoint 2003 (WSSv2), but with the added benefit that we can allways roll back the change.
It also means that in the first time you will edit that page, you will have to start from SharePoint Designer to do it:
Open the site that contains the page in SharePoint Designer (use "File>Open Site") and browse to the page you want to edit in the folder list.
Right click the file, and choose "Detach from page layout". This will unghost the file - copying it's layout from the layout page into the database, and so allowing you to edit it, just like you used to do in SharePoint 2003:

Unlike sharepoint 2003, you can take it back, and reattach the file:

I will create a contact list by using Sharepoint Designer and fill it with some sample data

Now, lets create a new page that we will use to create the xslt dataview in:

Open the page in SharePoint Designer

Now we can add the contacts list to the page using Sharepoint Designer. You can also do that from the browser before opening the page in Sharepoint Designer if you prefer:

Let us work in a clean environment - change the properties of the web part so it doesn't display the toolbar. Annoyingly, in Sharepoint Designer this means you have to open the dropdown menu for the web part (looks like a list icon) and select "change layout":

Select not to show a toolbar.
Now we can transform the web part to an XSLT dataview. Just right-click the web part and choose "convert to xslt data view":

The page should flash and then the web part will appear again, only slightly different. A new menu will appear with a lot more options (filter, sort and group, paging, edit columns, change layout, data view preview, show with sample data, conditional formatting, web part connections, parameters, refresh dataview, dataview properties).
Now you can start playing with it!
In this article I will not go over all the options - I will just conclude by showing you the conditional formatting, and how to deploy the web part to another page in the site:
Click on "Conditional Formatting" in the common data view tasks menu:

The task pane on the right should change to the "Conditional Formatting" pane. Now we can click a row (any will do), and then click the "create" menu, and choose "apply formatting" from the menu:

Because we selected a row, we can apply formatting to that row based on rules we will now define in this screen:

In this example I chose the rule - when first name is "Ishai". Press OK to get to the formatting options:

I set the formatting to show my contact's row with a light blue background, in bold and in uppercase.
Save the file, and view it in the browser:
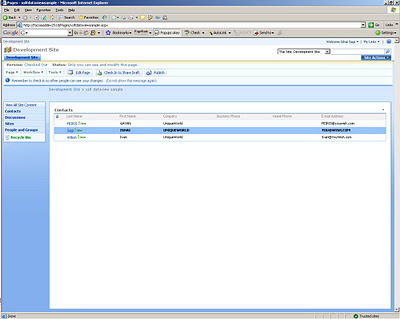
As you can see - it shows exactly what I wanted it. Now to deploy it to the home page of the site (which we didn't want to detach from the layout page):
In the browser, open the actions menu for the web part and click "export":

Now save the file to your desktop, and go to the homepage of the site. Switch to "edit page mode", click on "add a web part" in one of the zones, and then on the "advanced web part gallery and options" link at the bottom.
Use the dropdown at the top of the pane to switch to web part import pane:

Now, browse to the saved file and click the "upload" button. The web part should appear as an option in the pane. Drag and drop it to the zone you want it in:


And now you can click on "Exit Edit Mode" and see your wonderful new home page, that is still attached to it's layout page!
